Everyone is going to have a different take on this so here is my two cents worth.
I painted the base coat light gray.
Then I dabbed a thin blotchy coat of yellow ink over the whole skin surface. The less uniform the better.
Using thinned down purple inks I painted in the recesses of the eyes, and the hollows of the cheeks.
With black ink straight out of the bottle, I painted on some of the larger veins on the side of the face.
Again using the straight black ink I paint a bit sloppy around the nose, mouth, and visible wounds (zombie blood is rotten too so I use black).
The other two examples are zeds I painted at the same time.
The yellow and purple inks are GW and not longer in production.
The gray is Reaper and again is out of production.
The black ink was purchased from an art supply shop. Just look for India Ink.
My two cents. I hope you like.
Snitchy sends.
Total Pageviews
Wednesday, March 14, 2012
Tuesday, March 13, 2012
New horde base in the works.
I am starting up a new horde base and I figured I would give a step by step. Due to time constraints with work and regular life, these can take a while so I will try to keep up the posts.
I started with a 120mm base from Privateer Press. Link I sanded all of the facing studs off because a zombie horde will not have a facing.
Then I puttied the underside because I am going to be pinning each zed onto the base. I used Magic Sculpt putty since it dries rock hard. Magic Sculp
Then I covered the insert area with Magic Sculpt. I rolled it with a skewer to level it out. Once this Was done I used a ruler and a sculpting edge to scribe in the sidewalk, and used 60 grit sandpaper to press the cement texture into the putty. I pinned a couple of details like the corpse onto the base and then glued a couple of spots of sand and grit on.
I will keep you posted and I hope you like.
Snitchy sends.
I started with a 120mm base from Privateer Press. Link I sanded all of the facing studs off because a zombie horde will not have a facing.
Then I puttied the underside because I am going to be pinning each zed onto the base. I used Magic Sculpt putty since it dries rock hard. Magic Sculp
Then I covered the insert area with Magic Sculpt. I rolled it with a skewer to level it out. Once this Was done I used a ruler and a sculpting edge to scribe in the sidewalk, and used 60 grit sandpaper to press the cement texture into the putty. I pinned a couple of details like the corpse onto the base and then glued a couple of spots of sand and grit on.
I will keep you posted and I hope you like.
Snitchy sends.
Friday, February 24, 2012
Non wargame post.
This is just a quick one to show off another hobby. My wife collects skulls and skeletons. For Valentines day I did this up for her. She got other stuff too, but she loved her "Chicken Bones". I bought the specimen at the Tucson Gem and Mineral Show. Then I made a shadow box and mounted it inside. I made it look used like all of the purchased shadow boxes that we have. The kids next door love coming over because it is like coming to a museum where they can handle the exhibits.
The next few pictures will take a bit of an explanation. Two years ago I was driving home and saw a badger that was hit by a car. It was intact, and not leaking. I bagged it up, brought it home, and buried it on my land. My daughter and I just dug it up running all the loose dirt through three separate sized metal screens to get the small bones. I think that I got the whole thing.
Then I boiled it up in a mixture of bleach and water to remove the collagen from the bone. I did this on a burner plate out in my yard near the neighbors house that I don't like. Lucky for him it did not stink. Once I boiled it for four hours, I drained it out and soaked it in bleach over night. It came up nice.
This one is not mine, but it is what I intend to do.
Sorry for the photo quality. It was with my phone.
Hope you like.
Snitchy sends.
The next few pictures will take a bit of an explanation. Two years ago I was driving home and saw a badger that was hit by a car. It was intact, and not leaking. I bagged it up, brought it home, and buried it on my land. My daughter and I just dug it up running all the loose dirt through three separate sized metal screens to get the small bones. I think that I got the whole thing.
Then I boiled it up in a mixture of bleach and water to remove the collagen from the bone. I did this on a burner plate out in my yard near the neighbors house that I don't like. Lucky for him it did not stink. Once I boiled it for four hours, I drained it out and soaked it in bleach over night. It came up nice.
This one is not mine, but it is what I intend to do.
Sorry for the photo quality. It was with my phone.
Hope you like.
Snitchy sends.
Wednesday, January 4, 2012
My Gabions are up for sale.
I licensed these out to Itar's workshop and they are finally listed.
Here is a shot with some painted examples.
I made the masters a while ago and they have been sitting on the shelf. I also sent off some other items so there should be more of my terrain items up later.
Linkey
Hope you like.
Snitchy sends
Here is a shot with some painted examples.
I made the masters a while ago and they have been sitting on the shelf. I also sent off some other items so there should be more of my terrain items up later.
Linkey
Hope you like.
Snitchy sends
Friday, December 23, 2011
Zombieville post.
I have a terrain article in the Zombieville post. The 7ombieTV magazine.
Linkey
Hope you like.
Snitchy sends.
Linkey
Hope you like.
Snitchy sends.
Friday, December 16, 2011
Corrugated metal
Just a quick update. I purchased a Fiscars paper crimper on a lark a few months ago and it has sat in a drawer ever since. |
Then while working on some ducting at the house I found the perfect material to work with it. Metal ducting tape. |
First I pealed the backing off the metal and tape it to a scrap piece of paper and cut it to size. This will allow it to be glued to other surfaces since the backing is waxed. |
Then I run it through the crimper. |
After some quick weathering and damage you can see the effect. |
Hope you like.
Snitchy sends.
Friday, December 2, 2011
Horde Completed
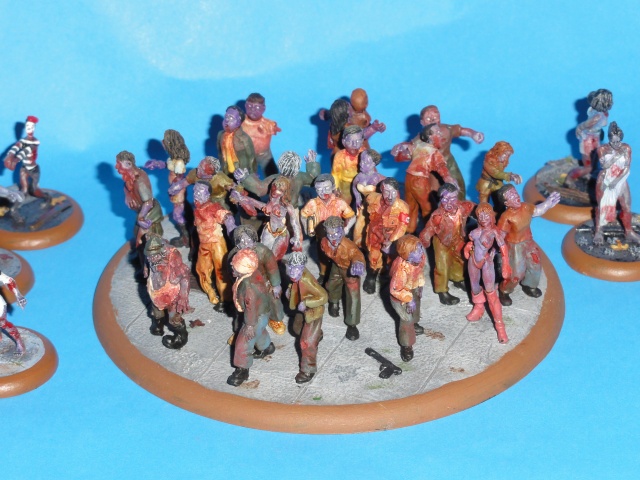
This is the completed horde that I started ages ago. It is raining out today so I cannot seal them and add the gore yet. The base is a 110mm beveled edge from Privateer. The majority of the zeds on the base are from Victory Force with some Reaper, Studio, and Wyrd thrown in. I have positioned them so no matter where you view the base from, there is at least one zed looking at you. Painting took forever as I only have three vices that could hold the pins in their feet. Hope you like.
Sorry for the poor quality images. Had to use the flash to get enough light. I will post better images later.
Snitchy sends.
Subscribe to:
Posts (Atom)