I have a terrain article in the Zombieville post. The 7ombieTV magazine.
Linkey
Hope you like.
Snitchy sends.
Total Pageviews
Friday, December 23, 2011
Friday, December 16, 2011
Corrugated metal
 |
Just a quick update. I purchased a Fiscars paper crimper on a lark a few months ago and it has sat in a drawer ever since. |
 |
Then while working on some ducting at the house I found the perfect material to work with it. Metal ducting tape. |
 |
First I pealed the backing off the metal and tape it to a scrap piece of paper and cut it to size. This will allow it to be glued to other surfaces since the backing is waxed. |
 |
Then I run it through the crimper. |
 |
After some quick weathering and damage you can see the effect. |
Hope you like.
Snitchy sends.
Friday, December 2, 2011
Horde Completed
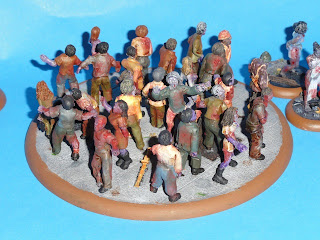
This is the completed horde that I started ages ago. It is raining out today so I cannot seal them and add the gore yet. The base is a 110mm beveled edge from Privateer. The majority of the zeds on the base are from Victory Force with some Reaper, Studio, and Wyrd thrown in. I have positioned them so no matter where you view the base from, there is at least one zed looking at you. Painting took forever as I only have three vices that could hold the pins in their feet. Hope you like.
Sorry for the poor quality images. Had to use the flash to get enough light. I will post better images later.
Snitchy sends.
Thursday, November 3, 2011
Smoke. NO not that kind.
I saw a post on one of the forums that I regularly visit that intrigued me. How to make cheap effective smoke. I have seen cotton balls, and steel wool. I have even seen someone who painted up great stuff for his counters.
This is my take on it. I am going to take my cue from the makers of Flames of War. The answer that I am going to try is wool.
I start with four different colors of yarn. If I was going to really produce this for game play, I would play with the colors to get the right look. Since this is a test I used two strands of gray and black yarn, and one each of red and yellow.
You separate the yarn into individual strands.
I used a dog brush to brush the strands out into individual fibers. If you do this with a large bunch of different color strands it mixes the colors for you. I brushed the fibers out and fold them over.
I then glue the smoke onto a per-textured base. This can be used as is or it can be teased out with a dental pick or other tool.
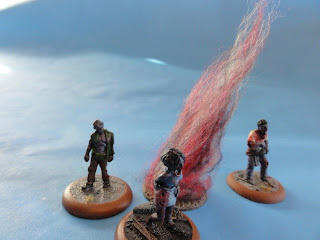
That is my take on Smoke. I think that if I do this for regular use counters, I will use more strands of black and gray. That would get the colors more like smoke and less like fire. Hope you like.
Snitchy sends
Saturday, October 29, 2011
Late birthday pressie
My wife sent me on a little plane ride for my birthday. Had to wait for them to come back from their tour.
Inside had more room than I expected.
Low Level over the Superstition Mountains.
The B 17 was an option, but I love smaller planes.
All for about the price of a ticket to Vegas. If you are in the Phoenix AZ area and interested, the fees go to maitnance, and upkeep of these flying museums.
Commemorative Air Force AZ.
Snitchy sends.
Friday, October 21, 2011
A couple of projects.
Just a quick update.
I am working on my Halloween decorations again. I used a great corpsing tutorial. Here.
I also started on a zombie horde base. I ordered some 120mm beveled edge bases from Privateer Press and added sidewalk texture and details.
Here are two test shots with the zombies in place. They are a mix of Reaper, Victory force, and Studio zeds.
All I got right now.
Snitchy sends.
I am working on my Halloween decorations again. I used a great corpsing tutorial. Here.
This was the end result. I actually had a sheriff deputy come over to see what I was doing while it was drying on my front porch.
I also started on a zombie horde base. I ordered some 120mm beveled edge bases from Privateer Press and added sidewalk texture and details.
Here are two test shots with the zombies in place. They are a mix of Reaper, Victory force, and Studio zeds.
All I got right now.
Snitchy sends.
Tuesday, October 4, 2011
Halloween.
This is the holiday that we go nuts on.
I found this link.
Instructables
And bought this plastic skull for $3.00 us at the dollar store.
I found this link.
Instructables
And bought this plastic skull for $3.00 us at the dollar store.
Once I did the eyes, I used a dog brush to shread three colors of yarn. I soaked this in wood glue and slapped it on the skull.
Nice and meaty. After all the glue dried, I gave it a coat of future floor polish to give it that glossy freshly skinned look.
Kitty approves.
Snitchy sends.
Thursday, August 25, 2011
Easy birds
From Andy Slater at Terragenesis. I saved it a while ago. When I went looking it was not on his site so here it is. Useful little toot.
Worthwhile tip.
Update. Found the location of his original file.
Original article
Snitchy sends.
Worthwhile tip.
Update. Found the location of his original file.
Original article
Snitchy sends.
Wednesday, August 17, 2011
Coin Laundry Complete
Here it is. Some action shots first for scale. Studio, Reaper, Hasselfree and Tengu models.
Exterior shots
Interior shots
Hope you like.
Snitchy sends.
Saturday, July 2, 2011
Coin Laundry WIP
Finally getting off my butt and working on some zombie terrain. My coin laundry. Just finished filling the gaps. Did a custom molds for quite few of the small parts. Building is stripped and embossed foam core. Hope you like. Will get images of the completed building as soon as I finish.
Hope you like.
Snitchy sends.
Hope you like.
Snitchy sends.
Thursday, April 28, 2011
Modern windows.
I pre-fabricate all of my windows on fantasy builds and I want to do the same for my modern builds. So here is what I did. I took three different types of plastic strip and make up my window frame, edging and middle brace.
I used Evergreen strip plastic sizes:
Rectangle 1.5mm X 2.5mm
Rectangle 1.0mm X 2.5mm
Quarter round 1mm
I decided to make two different size window frames for the mold.
1 inch by 1.5 inch
1.5 inch by 2.0 inch
Figure one is the basic cross section of the window frame. I build a box using the 1.5mm X 2.5mm strip standing up on the short side and a second box inside the first using the same sized styrene lying on its long side. I then glued 1/4 round around the interior corner of the window. Figure 2. shows the completed concept window with the middle brace. The middle brace is made with the 1.0mm X 2.5mm styrene.
I built both size windows and glued them to a plastic sheet. I then puttied the corners and edges and I built a mold box around the two windows.
I cast the mold in silicone and let it set for a day.
These are the cast parts.
This is what they look like in a work in progress shot.
Since I frame them in Popsicle sticks, I plan on gluing one window frame looking out, and one looking into the house. In between these I am planning on putting a sheet of clear plastic from a page protector sheet to simulate the glass.
Hope you like.
Snitchy sends.
Subscribe to:
Posts (Atom)


