I had some questions about my process for making trees. Initially I posted this tutorial. The guy had a post that is now deleted on how to make the jig so I am including a couple of photos of mine.
All made out of scrap wood.
This one is a photo of the hand crank.
It is almost all glued together. I just screwed in the upright since that would not hold with glue alone. It was pretty simple to build and works just like in the video. One thing to keep in mind is that the length of the bed (the small board on top) gives you the maximum height of any tree that you make on the jig. Mine can make pines up to twelve inches tall.
Hope that helps.
Snitchy sends.
Total Pageviews
Saturday, September 2, 2017
Thursday, August 31, 2017
To the trees
Hi all. First up an update to my rubberized horse hair tutorial. No photos unfortunately since I had to use it for another project. The first try did not work. The hair was brushed off and too fine. I then used horse mane and tail hair collected over a period of time. This was washed in dish washing detergent and let to dry until it was slightly damp. Once it was slightly dame I put it in a salable freezer bag and added my rubber. For the rubber I used mold making latex mixed one to one with water and added a couple of drops of dish washing liquid to breakup the water surface tension. The whole bag was shaken up and mixed well and then I drained off any liquid latex left and pulled out the hair. It was placed on a sheet of granny grating to drain completely.
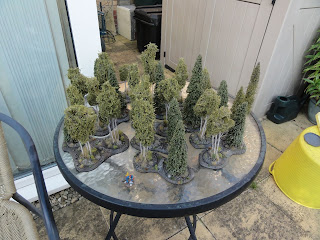
The project that I used it for was my forest and thought I would share. Pines are made using this tutorial. I followed it to make the armature and I used putty to make the bottom of the trunk. Once the putty was set I spray painted them black, used spray adhesive to attach the flock and finished off with clear plasti-dip spray rubber. The birch were made using my tutorial for Birch Trees. I added rubberized horse hair using fantastic elastic. Once this was set I used the spray adhesive and plasti dip again when I added the flocking. Bases are from 4 Ground. I did a total of ten bases with twenty four removable tree bases.
Here are the photos.
They fit in one little 35L box
Snitchy sends
The project that I used it for was my forest and thought I would share. Pines are made using this tutorial. I followed it to make the armature and I used putty to make the bottom of the trunk. Once the putty was set I spray painted them black, used spray adhesive to attach the flock and finished off with clear plasti-dip spray rubber. The birch were made using my tutorial for Birch Trees. I added rubberized horse hair using fantastic elastic. Once this was set I used the spray adhesive and plasti dip again when I added the flocking. Bases are from 4 Ground. I did a total of ten bases with twenty four removable tree bases.
Here are the photos.
Here is the difference between the homemade rubberized horse hair and the purchased.
Purchased
Home made
I tried this before without the plasti dip and the trees shed quite a bit.
All my forest together.They fit in one little 35L box
I had just finished when one of the guys in my game group asked me to base his trees too.
Hope you like.Snitchy sends
Saturday, July 1, 2017
Some more lasercut terrain
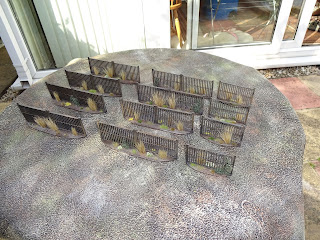
Just a quick post with some terrain that I finished. First are these fence sections from TT Combat terrain.
The rest are from Miniature Scenery. Satellite Dishes.
Truck.
Dune Buggy
This last one is showing scale on the Chimara for a question on a forum.
Hope you like.
Snitchy sends.
The rest are from Miniature Scenery. Satellite Dishes.
Truck.
Dune Buggy
This last one is showing scale on the Chimara for a question on a forum.
Hope you like.
Snitchy sends.
Sunday, June 4, 2017
Sector Mechanicus Alchomite Stack
I picked up the sector Merchanicus Alchomite Stack on a lark. It is all plastic, modular and has acceptable detail. Nice thing is that GW seems to have controlled their skull fettish so there is only a couple of them hidden here or there. I based them to fit in with my existing terrain. Mini on a 25mm base for scale.
Hope you like.
Snitchy sends.
Hope you like.
Snitchy sends.
Sunday, May 28, 2017
Another Salute purchase done
Picked this kit up from Warmill at Salute this year. It was missing a couple of parts and they shipped them out pretty quick. Build was straightforward and it has some pretty good detail I added bits from both Ainsty and Zing Industries. I still have some weathering, details and vegetation left to add.
Hope you like.
Snitchy sends.
Hope you like.
Snitchy sends.
Monday, May 15, 2017
New Frostgrave and Rougestars
Just a quick update. Finished some of my loot from Salute. Here is the Frsotgrave stuff. Some soldiers and new wizards. Sorry for the craptastic photos. Still unpacking and figuring out where I can take some good ones.
Here is my new Rougestars crew.
Hope you like.
Snitchy sends.
Here is my new Rougestars crew.
Hope you like.
Snitchy sends.
Monday, April 3, 2017
Toolbox
Since I have been unpacking I have taken the opportunity to organize my modeling toolbox. I tend to be a bit of a tool whore and if I see a new tool I generally have to have it.
Top is large hand tools rulers, squares and large cutters.
Punches and wire bending tools and jigs.
Small hand cutters, chisels and planes.
Greenstuff World textured rollers.
Press molds and silicone tipped tools.
Metal sculpting tools
Pin vises, knives, hobby saw, scissors, files, long and small tools at the bottom
Hand cutters, tweezers, wire bending tools and punches.
Here are the punches. Gold shaping cups, hex punch and circle punch.
I still have some more tools to sort out but they are in other boxes and I am still building my hobby space again.
Snitchy sends.
Top is large hand tools rulers, squares and large cutters.
Small hand cutters, chisels and planes.
Greenstuff World textured rollers.
Press molds and silicone tipped tools.
Metal sculpting tools
Pin vises, knives, hobby saw, scissors, files, long and small tools at the bottom
Hand cutters, tweezers, wire bending tools and punches.
Here are the punches. Gold shaping cups, hex punch and circle punch.
I still have some more tools to sort out but they are in other boxes and I am still building my hobby space again.
Snitchy sends.
Rubberized Horsehair
Hiya,
Been a while since I have posted. Had to move house and unpacking has taken the majority of my time.
I have been trying to get my hands on rubberized horsehair since I read about it in Terrain modeling by Richard Windrow. It is needless to say been incredibly difficult to get. Apparently it was used as furniture padding prior to foam and is not longer used normally. You can find it at specialty vendors for specialty prices. I generally try not to spend specialty prices when I can so I am attempting to make some. First you need a donor for the hair. Here I have a crossover with my wife and daughters hobbies.
When spring hit the Pony was shedding like crazy. So a bit pf brushing gathered a huge amount of hair. I took this and used Fairy liquid dish soap to clean it and let it dry.
Next I laid it out on granny grating in a bucket. Then took some mold making latex and mix it one to one with water.
This was poured onto a layer of horsehair on the grating and then left to dry. Here are a couple of photos of the drying horsehair.
Once I get some made up in terrain I will share it.
Hope you like.
Snitchy sends.
Subscribe to:
Comments (Atom)


